
Technical SEO Checklist for Beginners: Make Your Website Easier for Google to Crawl and Index
Publishing a useful article is only one part of SEO. Before a page can attract organic traffic from Google, search engines need to discover it, crawl its content, understand which URL should appear in search results, and determine whether it is eligible for indexing. Technical problems can interfere with any of these steps, even when the content itself is excellent.
This is where a technical SEO checklist becomes valuable.
Technical SEO focuses on the infrastructure and accessibility of your website. It includes crawling, indexing, website architecture, XML sitemaps, robots.txt, canonical URLs, HTTPS, mobile usability, page performance, structured data and other elements that help search engines access and interpret your pages.
You do not need to be a developer to understand the fundamentals. Most small websites and blogs can resolve many common technical SEO issues using Google Search Console, a browser, a performance testing tool and the settings available in their content management system.
In this guide, we will walk through the checks that matter, explain how to perform them, identify common mistakes and show you how to prioritize fixes without wasting time on unnecessary technical adjustments.
What Is Technical SEO?
Technical SEO is the process of improving a website’s technical foundation so search engines can efficiently discover, crawl, render and index its important content.
Think of your website as a library. Your articles are the books, your navigation is the directory, and your technical infrastructure determines whether visitors can enter the building, find the right shelves and access the books. If the doors are locked or the catalogue points to the wrong place, even the best collection becomes difficult to discover.
Technical SEO addresses those underlying problems.
It differs from on-page SEO, which focuses more directly on elements such as headings, page titles, content quality and search intent. It also differs from off-page SEO, which includes external signals such as backlinks and brand mentions. These areas work together, but each solves a different part of the search visibility problem.
For a broader introduction, connect this guide with BlogEarns’ existing SEO for New Bloggers resource and your relevant SEO learning articles. Technical improvements help make good content accessible, but they do not replace useful content, appropriate search intent or a strong overall SEO strategy.
Why Does Technical SEO Matter?
A technically sound website gives search engines a clearer path to its important pages. It also helps visitors navigate the site, access content securely and use it across different devices.
The benefits include:
- Better discoverability: Search engines can find important pages through crawlable links and sitemaps.
- Fewer indexing problems: Correct directives and canonical signals reduce avoidable confusion.
- Improved user experience: Faster, more stable pages can make reading and navigation easier.
- Cleaner website architecture: Logical categories and internal links help users move between related topics.
- More reliable site migrations: Redirects and canonicalization help preserve access when URLs change.
- Better diagnosis: Search Console and technical testing tools help you identify the actual causes of visibility problems.
Technical SEO does not guarantee higher rankings. Google can choose not to index a page even when the site is technically sound. However, resolving technical barriers ensures that your valuable content has a better chance of being discovered and evaluated.
Google’s official SEO Starter Guide is a useful companion resource for understanding how search engines discover and interpret website content.
The Complete Technical SEO Checklist for Beginners
The following technical SEO checklist is organized in the order I recommend for most beginner websites: first make sure search engines can access your pages, then verify indexing, fix structural problems, improve performance and monitor the results.
You do not have to complete every task in one sitting. Start with issues that prevent important pages from appearing in search results, then move on to improvements that make the website easier to crawl and use.
1. Set Up Google Search Console
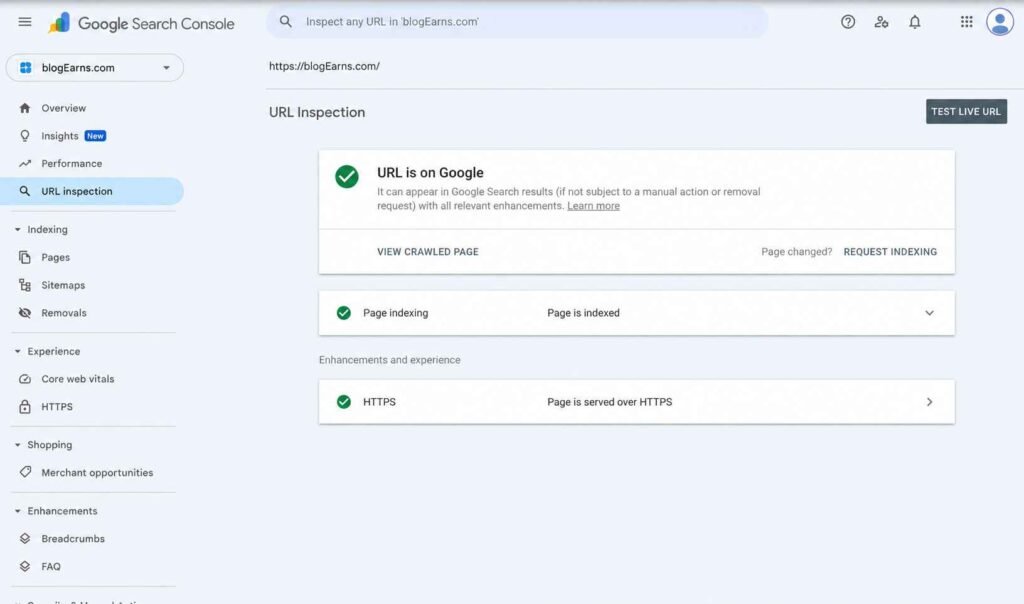
Google Search Console is the first tool I recommend setting up before carrying out a detailed technical SEO audit. It helps website owners understand how Google discovers their pages, which URLs are indexed, what queries generate impressions and whether Google has detected particular indexing or experience problems.
To get started, open Google Search Console, add your website as a property and verify ownership.
A Domain property is useful when you want to monitor the domain across its subdomains and URL protocols. Verification typically requires adding a DNS record. A URL-prefix property is another option and can be verified using one of the supported methods.
After verification, allow the tool to collect data. Some reports will not populate immediately.
What should you check?
- Page indexing: Identify URLs that are indexed and those excluded from indexing.
- URL Inspection: Investigate individual pages and check their indexing status.
- Sitemaps: Submit your XML sitemap and monitor its processing.
- Core Web Vitals: Review the available field-performance data.
- Performance: Identify pages and search queries receiving impressions and clicks.
- Manual actions and security issues: Check whether Google has reported a manual action or security problem.
Do not assume that every URL excluded from indexing represents an error. Search engines should not necessarily index login pages, duplicate URLs, internal search results or other low-value pages.
The goal is to ensure that your important, original content is eligible for indexing and that unintended exclusions are corrected.
Beginner tip: When a blog post is missing from Google, inspect that exact URL before changing site-wide settings. This helps you avoid fixing the wrong problem.
2. Make Sure Google Can Crawl Your Website
Crawling is the process through which a search engine requests and examines URLs. If Googlebot cannot access important pages or the resources needed to render them, Google may struggle to understand the content.
Start by opening a few important pages in a private browser window. Check that they load without a login, an access restriction or an unexpected error.
Then investigate the following:
- Are important pages returning successful HTTP responses?
- Are any firewall or security rules accidentally blocking search crawlers?
- Are essential CSS and JavaScript resources accessible?
- Can Google discover pages through normal HTML links?
- Are important sections accidentally blocked by robots.txt?
Google’s technical SEO guidance for developers explains how crawlability, rendering, internal links and indexing controls work together.
Understand common HTTP status codes
| Status code | Meaning | Recommended action |
|---|---|---|
| 200 | The request succeeded | Confirm that the page contains the intended content |
| 301 | Permanent redirect | Ensure it points to the correct destination |
| 302 | Temporary redirect | Confirm that the temporary redirect is intentional |
| 404 | Page not found | Restore the page, redirect it if appropriate, or leave the genuine 404 |
| 410 | Content is gone | Use when removal is intentional and the server supports it |
| 403 | Access forbidden | Investigate whether legitimate visitors or crawlers are blocked |
| 5xx | Server-side error | Investigate hosting, server configuration or application failures |
A 404 response is not automatically a technical SEO disaster. Deleted pages can legitimately return 404 or 410 responses. Problems arise when valuable pages disappear unexpectedly, internal links point to missing content or important URLs consistently return server errors.
For a WordPress website, review hosting logs, security plugins, caching settings and recent configuration changes when unexpected errors occur.
3. Check Your Robots.txt File
The robots.txt file provides instructions to compliant crawlers about which parts of a website they may request. It is commonly found at the root of the domain.
For example:
https://example.com/robots.txt
A simple robots.txt file might look like this:
User-agent: *
Disallow: /private-area/
Allow: /

Sitemap: https://example.com/sitemap.xml
This is only an illustrative example. Do not copy it blindly into a production website, because your site’s actual structure and requirements may differ.
How to audit robots.txt
Open your site’s robots.txt URL and check whether the rules are intentional. Look for accidental restrictions affecting important categories, articles, images or resources.
A common mistake is blocking the entire site:
User-agent: *
Disallow: /
This rule tells matching crawlers not to crawl any URL on the site. If added unintentionally, it can interfere with the discovery and processing of your content.
Also remember an important distinction: robots.txt is not a reliable way to remove a URL from Google’s index. A blocked URL may still appear in search results, sometimes without a descriptive snippet. If you need a page excluded from search, use an appropriate indexing control such as a noindex directive while ensuring Google can crawl the page to see that directive.
Google explains this distinction in its crawling and indexing documentation.
For a small blog, the safest approach is to avoid unnecessary robots.txt restrictions. Block only what you have a clear reason to block.
4. Create and Submit an XML Sitemap
An XML sitemap lists URLs that you want search engines to discover and consider for crawling. It is particularly useful for larger websites, newly published articles and pages that do not receive many internal links.
A typical sitemap URL might be:
https://example.com/sitemap.xml
However, your actual sitemap location depends on your platform and configuration.
How to check your sitemap
- Open the sitemap URL in your browser.
- Confirm that it loads without errors.
- Check that it contains the canonical URLs of important pages.
- Remove URLs that should not be indexed, such as unintended duplicate or redirected URLs.
- Submit the sitemap through Google Search Console.
- Monitor the reported status and investigate processing errors.
WordPress installations often generate sitemaps automatically through WordPress core or an SEO plugin. Blogger and other platforms may use different sitemap locations or formats.
Do not create multiple competing sitemaps without a clear purpose. Instead, identify the sitemap your platform already generates and verify that it works correctly.
Google recommends including the canonical URLs you want considered for search results. Submitting a sitemap helps with discovery, but it does not guarantee that every listed URL will be crawled or indexed.
Related reading: If your articles are not appearing in search, connect this guide with BlogEarns’ SEO Site Analysis guide to investigate broader technical and content issues.
5. Fix Indexing Problems
One of the most important parts of a technical SEO checklist is verifying that search engines can index the pages you actually want to rank.
Crawling and indexing are different processes. Google can crawl a URL without adding it to the index. It can also discover a URL but decide not to crawl it immediately.
Review the Page Indexing report
In Google Search Console, open the Page indexing report and examine the reasons URLs are excluded.
Pay particular attention to these situations:
- Crawled, currently not indexed: Google crawled the URL but has not indexed it.
- Discovered, currently not indexed: Google knows about the URL but has not crawled it.
- Blocked by robots.txt: A robots.txt rule prevents crawling.
- Excluded by
noindex: A directive tells search engines not to index the page. - Duplicate without user-selected canonical: Google identified a duplicate and selected a canonical URL without an explicit choice from the site owner.
- Page with redirect: The URL redirects elsewhere and generally is not the final URL intended for indexing.
- Not found (404): The URL does not return a page successfully.
The correct fix depends on the specific reason and the purpose of the URL. Do not try to force every excluded URL into the index.
What to do when a valuable page is not indexed
First, inspect the URL in Search Console. Then check whether the page is accessible, returns an appropriate status code, is allowed to be indexed and contains the intended canonical signal.
Next, review its content and internal links. If the page is thin, substantially duplicates another article or offers little additional value, improve or consolidate the content rather than repeatedly requesting indexing.
After correcting a genuine issue, use URL Inspection to request indexing where appropriate. Google decides when and whether to process the request.
For more context, read BlogEarns’ existing What Is SEO? Complete Guide for Beginners, which provides a foundation for understanding indexing alongside the other parts of search optimization.
6. Audit Canonical URLs and Duplicate Content
Websites can expose the same or substantially similar content through multiple URLs. For example, protocol variations, tracking parameters, alternative paths or inconsistent URL settings may create several addresses for similar content.
Canonicalization helps search engines identify the preferred URL among duplicate or similar pages.
A canonical tag typically appears in the HTML head:
<link rel="canonical"
      href="https://example.com/technical-seo-guide/" />
The URL shown is an example. Replace it with the actual preferred URL for your page.
Your canonicalization checklist
- Choose a consistent preferred domain and protocol.
- Ensure each important page points to the correct canonical URL.
- Keep canonical URLs consistent with internal links.
- Include preferred URLs in your sitemap.
- Avoid canonicalizing unrelated pages to a generic page or homepage.
- Check that redirected URLs do not compete with their final destinations.
- Review canonical signals after migrations or URL changes.
Suppose an article is available at both:
https://example.com/seo-guide
and
https://example.com/seo-guide/?ref=newsletter
If the parameter only tracks the source of a visit and does not create a distinct page, the clean URL may be the appropriate canonical version.
However, do not canonicalize pages simply because they share a template. Two articles can have the same design while serving different search intents.
Google treats canonical tags as signals rather than absolute commands and can select a different canonical URL when its systems determine another version is more appropriate. See the official canonical URL documentation.
7. Use SEO-Friendly URL Structures
A good URL is descriptive, readable and reasonably concise. Visitors should have some idea what a page contains before clicking it.
Compare these examples:
- Better:
example.com/technical-seo-checklist/ - Less descriptive:
example.com/post?id=8472
Search engines can process many URL formats, so a short URL alone does not guarantee better rankings. The purpose of a clean URL is clarity and consistency.
URL structure checklist
- Use meaningful words.
- Avoid unnecessary parameters and identifiers.
- Use a consistent trailing-slash convention.
- Keep URLs lowercase where practical.
- Avoid changing established URLs without a good reason.
- Use permanent redirects when a URL genuinely moves.
- Ensure internal links point directly to the preferred destination.
For an existing article that already ranks or attracts backlinks, do not change its URL merely to make it shorter. A migration introduces extra work and potential risk. If a URL change is necessary, map old URLs to their most relevant new destinations and update internal links, canonicals and sitemaps.
Google’s URL structure guidance provides further recommendations.
8. Improve Internal Linking and Website Architecture
Internal links connect pages on your own website. They help readers discover related information and provide search engines with paths to other URLs.
For a content website such as BlogEarns, internal linking is particularly important because new articles need to connect with existing topic clusters.
For example, an article about technical SEO could naturally link to:
These links provide useful context for readers exploring the broader subject of search optimization.
How to audit internal links
Start with your most important pages and check whether readers can reach them through relevant navigation, category pages and contextual links.
Then look for:
- Important articles with no internal links pointing to them.
- Broken internal links.
- Links that redirect unnecessarily.
- Pages buried several clicks deep without a good reason.
- Repeated generic anchors such as “click here.”
- Excessive links to unrelated pages.
- Important articles that are not linked from their relevant pillar content.
Use descriptive anchor text that explains what the destination covers. For instance, “technical SEO checklist” is more informative than “read more” when linking to this article from a relevant page.
Google recommends crawlable links and descriptive anchor text, while noting that there is no magic number of links that every page must contain.
What about orphan pages?
An orphan page is a URL that has no meaningful internal links pointing to it. Such pages may be difficult for users and crawlers to discover through normal site navigation.
A sitemap may help search engines discover an orphan URL, but it does not replace a useful internal linking structure.
If a page deserves organic traffic, link to it from relevant existing articles, categories or other appropriate navigation elements.
9. Make Sure Your Website Works on Mobile Devices
Google predominantly uses the mobile version of a site’s content for indexing. If the mobile version hides important content, links or metadata that exist on desktop, search engines may not receive the same information you intended to publish.
Open your most important pages on a phone or use your browser’s responsive testing tools.
Check that:
- Text is readable without horizontal scrolling.
- Navigation and menus work correctly.
- Buttons and links are easy to tap.
- Main content is available on mobile.
- Images resize appropriately.
- Pop-ups do not prevent users from accessing the page.
- Important internal links remain accessible.
- Mobile pages do not suffer from major layout shifts.
Responsive design is generally a practical solution because it allows one URL to adapt to different screen sizes.
Avoid maintaining separate desktop and mobile content unless you have a clear technical reason. If the site uses a separate mobile configuration, verify that the content and relevant SEO signals remain consistent.
10. Improve Website Speed and Core Web Vitals
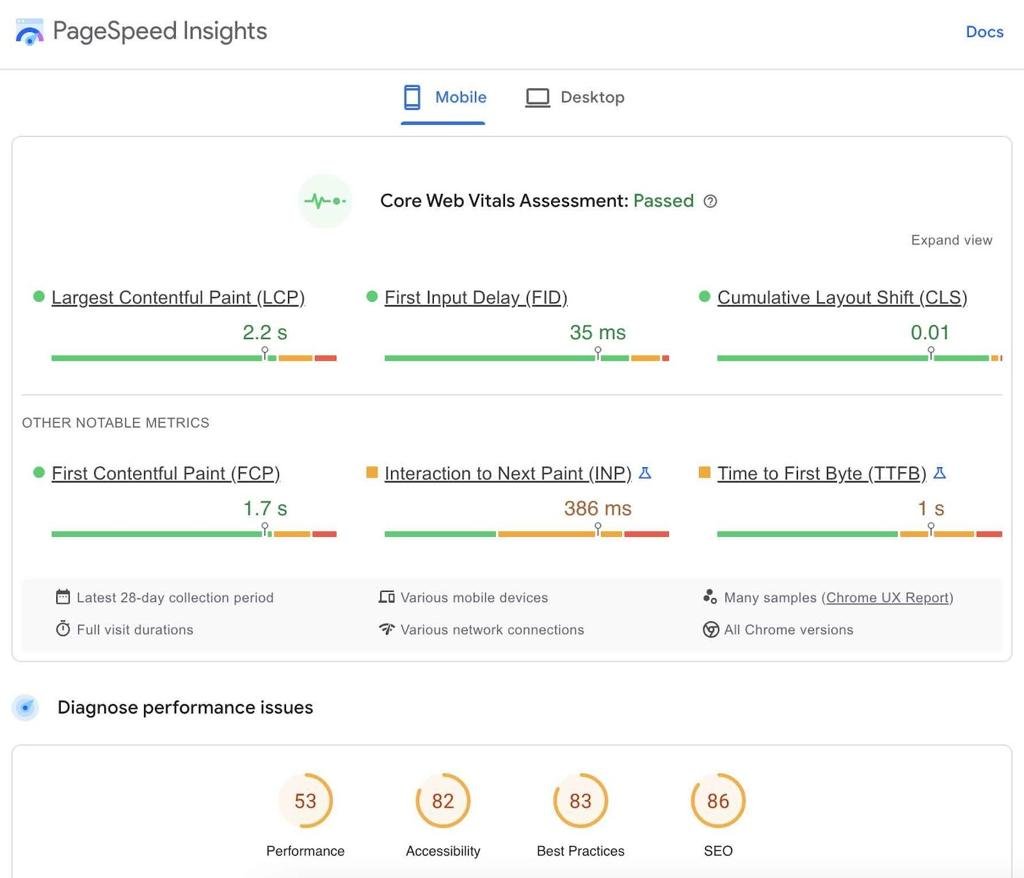
Website speed affects usability, but a common mistake is to treat a perfect performance score as the sole goal of technical SEO.
Google’s Core Web Vitals measure three aspects of real-world page experience:
| Metric | What it measures | Good target |
|---|---|---|
| LCP | Loading performance | 2.5 seconds or less |
| INP | Responsiveness to interactions | 200 milliseconds or less |
| CLS | Visual stability | 0.1 or less |
These targets are evaluated at the 75th percentile of page visits, segmented by mobile and desktop where applicable.
How to test your website
Use Google PageSpeed Insights to test important URLs. The report can include both field data from real users and lab data from a controlled test environment. Field data may not be available for every page.
Use the findings to identify the biggest problems rather than blindly applying every recommendation.
Common causes of poor performance include oversized images, excessive JavaScript, render-blocking resources, slow server responses, unoptimized fonts and unstable ad placements.
Practical improvements
- Compress large images and serve suitable dimensions.
- Use modern image formats where supported.
- Lazy-load below-the-fold images when appropriate.
- Avoid lazy-loading the main image responsible for LCP.
- Reduce unnecessary scripts and third-party widgets.
- Configure caching correctly.
- Use a reliable hosting environment.
- Reserve space for images and advertisements to reduce layout shifts.
- Review plugins that add unnecessary code or requests.
If your website uses WordPress, start with a performance test before installing another optimization plugin. Multiple plugins that perform overlapping caching or minification functions can create conflicts.
Core Web Vitals are part of Google’s page-experience considerations, but passing all three metrics does not guarantee a particular ranking. Content relevance and overall usefulness remain essential.
11. Secure Your Website With HTTPS
HTTPS protects the connection between a website and its visitors by encrypting data in transit. It is a fundamental security requirement for modern websites and one of the technical basics every blogger should verify.
Open several pages on your website and check whether they load using https:// without browser security warnings.
Your HTTPS checklist should include:
- A valid SSL/TLS certificate.
- Automatic redirection from HTTP to HTTPS where appropriate.
- Consistent internal links using HTTPS.
- Canonical tags pointing to HTTPS URLs.
- An XML sitemap containing preferred HTTPS URLs.
- No unnecessary HTTP resources loaded inside HTTPS pages.
- Correct redirects after certificate renewals or hosting changes.
A mixed-content warning occurs when an HTTPS page attempts to load certain resources over insecure HTTP. Depending on the resource and browser, this can cause security warnings or blocked content.
Also ensure that the HTTP version of each important page redirects to its HTTPS equivalent rather than sending every HTTP request to the homepage.
If you recently migrated your site to HTTPS, monitor Search Console and check the redirect mapping. Avoid changing multiple URL conventions at the same time unless you have planned and tested the migration carefully.
12. Fix Broken Links and Redirect Chains
Broken links frustrate visitors and make it harder to navigate your website. Redirects are useful when URLs move, but unnecessary redirect chains add complexity and may slow down access.
A redirect chain occurs when one URL redirects to another URL, which redirects again before reaching the destination.
For example:
Page A → Page B → Page C
Where possible, update the original link to point directly to Page C.
What to check
- Internal links returning 404 errors.
- Links pointing to outdated URLs.
- Redirects that lead to irrelevant pages.
- Redirect loops.
- Long chains of redirects.
- Important external links that no longer work.
- Old URLs that should redirect after a content migration.
Not every broken external link will affect your site’s rankings, and not every 404 needs to be redirected. The right response depends on whether a meaningful replacement exists.
If you deleted an article and published a genuinely equivalent replacement, a permanent redirect may be appropriate. If the content is gone and there is no relevant substitute, a proper 404 or 410 response can be the correct outcome.
For BlogEarns, pay special attention to older articles whose URLs or destinations may have changed over time. Fixing internal links is often easier than trying to recover traffic after users repeatedly encounter missing pages.
13. Optimize Images and Other Media
Images can make articles easier to understand, but poorly implemented media can slow down a page and create accessibility problems.
Use descriptive file names and alternative text that accurately describes meaningful images. For example, technical-seo-audit-checklist.png is more informative than IMG0001.png.
Your image checklist should include:
- Compress images without sacrificing necessary quality.
- Use appropriate dimensions for the displayed layout.
- Serve modern image formats where suitable.
- Add descriptive alt text to informative images.
- Use empty alt attributes for purely decorative images.
- Avoid placing essential text only inside images.
- Set image dimensions where practical to help prevent layout shifts.
- Use lazy loading for suitable below-the-fold images.
Alt text is primarily an accessibility feature. It should describe the image’s meaning in context rather than act as a place to stuff keywords.
For example, an image showing a sitemap submission screen might use the alt text “Google Search Console sitemap submission screen.” If the image is decorative and adds no information, an empty alt attribute is usually more appropriate.
Also consider whether large images are affecting your main content’s loading performance. A massive hero image can delay the point at which a visitor sees the page’s primary content.
14. Check Your Website’s JavaScript and Rendering
Modern websites often use JavaScript to load menus, display content, generate links and support interactive features. Search engines can process JavaScript, but rendering introduces additional complexity.
A technical audit should confirm that important content is not unintentionally hidden from crawlers.
Check whether:
- Main article content appears in the rendered page.
- Navigation links use crawlable HTML links.
- Important content does not require a user interaction to become available.
- Essential CSS and JavaScript resources are accessible.
- Cookie banners or overlays do not prevent content from rendering.
- Important text is not available only through images.
- Different rendering methods do not produce inconsistent content.
For most conventional WordPress or Blogger sites, you do not need to redesign the site simply because it uses JavaScript. Focus on actual problems demonstrated by testing.
If Search Console’s URL Inspection tool shows that Google cannot see important page content, compare the rendered result with what users see in a normal browser. This can help identify blocked resources or scripts that fail during rendering.
15. Implement Structured Data Correctly
Structured data is a standardized way to describe information on a webpage so search engines can better understand its content. It is commonly implemented using JSON-LD.
Depending on the page, relevant schema types may include:
ArticleorBlogPostingBreadcrumbListOrganizationPersonProductRecipeVideoObject
Only use schema types that accurately represent the visible content and purpose of the page.
For example, an informational technical SEO article may use Article or BlogPosting structured data. A breadcrumb trail may use BreadcrumbList when it accurately reflects the site’s navigation.
Structured data checklist
- Select a schema type that fits the page.
- Include required properties where applicable.
- Ensure the structured data matches visible page content.
- Avoid inventing ratings, reviews, prices or other unsupported information.
- Test the markup with Google’s Rich Results Test.
- Validate schema syntax and review relevant Search Console reports.
Structured data can make pages eligible for certain enhanced search appearances, but eligibility does not guarantee that Google will display a rich result.
Do not add every available schema type simply to increase the amount of markup on a page. Accurate, relevant structured data is more valuable than excessive or misleading markup.
16. Audit Your Website Navigation and Category Pages
Your website architecture should help readers move from broad subjects to specific articles without unnecessary confusion.
For a content site like BlogEarns, a clear structure might look like this:
- SEO
- Keyword research
- Technical SEO
- On-page SEO
- Google Search Console
- WordPress
- Plugins
- Themes
- Troubleshooting
- Blogging
- Starting a blog
- Content strategy
- Traffic growth
- Monetization
This is an example of a logical topic hierarchy, not a requirement to restructure every existing URL.
What should you inspect?
Review your main navigation, category pages, breadcrumbs and contextual internal links. Ensure category pages provide a useful way to explore related articles rather than functioning as empty archives.
Avoid creating dozens of near-identical categories that contain only one or two unrelated posts. Similarly, avoid forcing every article into multiple categories when one clear primary category would be enough.
A reader who lands on a technical SEO article should be able to discover related SEO guides naturally. That helps your content cluster function as a coherent learning resource.
Google can understand many different site structures, so do not redesign your entire website solely to achieve a theoretically perfect hierarchy. Improve the areas where the current structure genuinely makes content difficult to find.
17. Review Pagination, Archives and Low-Value URLs
Blogs often generate URLs beyond individual articles, including category archives, author archives, date archives, search pages, tag pages and paginated listings.
These URLs are not automatically bad. They can help visitors navigate a website. Problems arise when they create large numbers of thin, repetitive or confusing pages that provide little value.
Review the following:
- Are important category pages accessible and useful?
- Do pagination links allow users to discover older articles?
- Are internal search results creating unnecessary indexable URLs?
- Are parameter-based URLs producing unwanted duplicates?
- Are empty tag or category archives being generated?
- Are pages accidentally marked
noindexwhen they should be indexed? - Are low-value URLs consuming attention without serving a clear user need?
Do not automatically block all tag pages or archive pages. Evaluate their usefulness and whether they provide distinct value to visitors.
For paginated content, make sure users and crawlers can follow normal links to subsequent pages. Do not assume that adding a canonical tag to page one is the correct solution for every paginated archive.
The right configuration depends on the purpose of each URL and the content it contains.
18. Monitor Website Performance and Technical Errors Regularly
Technical SEO is not a one-time task. Websites change when you publish articles, update plugins, change hosting, install tracking scripts or redesign templates.
A site that was healthy last month can develop problems after a seemingly minor change.
Set up a simple monitoring routine.
| Frequency | What to check |
|---|---|
| Weekly | Important pages, new indexing issues, unexpected traffic changes |
| Monthly | Core Web Vitals, broken internal links, sitemap status and key templates |
| After major updates | Redirects, canonicals, robots.txt, mobile rendering and indexing |
| After migrations | HTTP status codes, redirect mapping, sitemap URLs and canonical signals |
| Quarterly | Overall architecture, outdated pages, crawlability and technical priorities |
You do not need to run a full enterprise-level crawl every day. A small website can start with Search Console, a few manual checks and a periodic site audit.
The key is to catch important problems early and prioritize them according to their effect on users and search visibility.
A Practical Technical SEO Checklist You Can Use Before Publishing
Use the following checklist for a new website or when reviewing an important article. It covers the fundamentals without requiring advanced development knowledge.
Technical SEO checklist
0/20
Crawling and indexing
Important pages load successfullyRobots.txt does not block important contentNo unintended noindex directivesImportant pages can be discovered through crawlable linksURL Inspection checked for key pages
Sitemaps and URLs
XML sitemap loads correctlySitemap includes preferred canonical URLsCanonical tags point to the correct pagesRedirects lead to relevant destinationsURL structure is clear and consistent
Performance and usability
HTTPS works without security warningsMobile layout is readable and usablePageSpeed Insights checked for key templatesImages are appropriately sized and compressedNo major layout shifts or broken interactive elements
Content and structure
Internal links connect relevant articlesNo important orphan pages remainHeadings and navigation are logicalStructured data matches visible contentBroken internal links are resolved or intentionally retained
Copy checklistReset
Use this checklist as a repeatable process rather than a one-time scorecard. If a check fails, investigate the specific URL or template before making broad changes.
How to Prioritize Technical SEO Issues
Not every technical issue deserves the same level of attention. A missing canonical tag on an important article may be worth investigating, while a minor warning on an unimportant archive page may have little practical effect.
I recommend prioritizing issues in this order:
First, fix problems that prevent access or indexing. These include accidental site-wide noindex directives, incorrect robots.txt rules, server errors affecting important pages and broken redirects.
Second, fix problems that confuse URL selection or discovery. Review incorrect canonical tags, duplicate URL patterns, missing internal links and sitemap inconsistencies.
Third, improve performance and usability. Investigate slow loading, poor responsiveness, layout shifts, mobile navigation problems and oversized images.
Finally, address refinements. These include improving schema implementation, cleaning up unnecessary URL variations and refining the navigation structure.
This approach prevents you from spending hours optimizing minor details while important pages remain inaccessible.
Common Technical SEO Mistakes Beginners Should Avoid
Several common mistakes can create more problems than they solve.
Changing URLs without redirects: If an established article changes its URL, update internal links and implement appropriate redirects. Do not leave the old URL pointing to a missing page when a direct replacement exists.
Blocking pages with robots.txt when you need noindex: Blocking crawling can prevent Google from seeing a noindex directive. Use the correct mechanism for your goal.
Submitting every URL in a sitemap: Include preferred URLs that you want search engines to consider, rather than every URL the website can generate.
Installing too many SEO plugins: Overlapping plugins can introduce conflicting metadata, canonical tags, sitemaps or performance settings. Use a configuration you understand and can maintain.
Chasing a perfect PageSpeed score: Focus on meaningful improvements to loading, responsiveness and stability. A score of 100 is not a prerequisite for ranking.
Treating every excluded URL as an error: Some pages should not be indexed. Investigate why a URL is excluded before attempting to change its status.
Ignoring content quality: Technical SEO cannot compensate for an article that does not answer the searcher’s question. Make sure your technical work supports useful, relevant content.
Frequently Asked Questions About Technical SEO
| 1. What is a technical SEO checklist? |
|---|
| A technical SEO checklist is a structured set of checks used to identify problems affecting a website’s crawlability, indexability, URL structure, performance, security and navigation. It helps website owners systematically identify and prioritize technical improvements. |
| 2. Is technical SEO necessary for beginners? |
| Yes. Beginners should understand the basics because incorrect indexing settings, broken links, inaccessible pages and sitemap problems can prevent valuable content from being discovered or processed correctly. You can perform many checks without writing code. |
| 3. Which tool is best for a technical SEO audit? |
| Google Search Console is an excellent starting point because it provides information about indexing, search performance, sitemaps and reported page experience. PageSpeed Insights is useful for performance testing. Larger websites may also benefit from dedicated crawling tools. |
| 4. How often should I perform a technical SEO audit? |
| For a small blog, review key Search Console reports weekly, perform a broader technical check monthly and audit after major website changes. Large or frequently updated websites may need more frequent automated monitoring. |
| 5. Does technical SEO directly improve rankings? |
| Technical SEO helps search engines access and understand your pages, and it can remove obstacles to search visibility. However, completing a checklist does not guarantee higher rankings. Content relevance, usefulness, competition and other search systems also influence results. |
| 6. What is the difference between crawling and indexing? |
| Crawling means a search engine requests and processes a URL. Indexing means it evaluates the content and may store it in its search index. A page can be crawled without being indexed, and discovery does not guarantee that crawling will happen immediately. |
| 7. Do I need coding skills for technical SEO? |
| Not for many beginner-level tasks. You can inspect sitemaps, review Search Console, test performance and check URLs using accessible tools. More complicated problems involving server configuration, JavaScript rendering or large-scale redirects may require developer assistance. |
| 8. How can I check whether Google has indexed my website? |
| Verify your site in Google Search Console and review the Page indexing report or inspect a specific URL. A site: search can offer a rough indication of indexed pages, but Search Console is the better diagnostic tool. |
| 9. Does an XML sitemap guarantee indexing? |
| No. A sitemap helps Google discover URLs and understand which canonical pages you prefer to be considered for indexing. Google still decides which URLs to crawl and index. |
| 10. What is the most important part of a technical SEO checklist? |
| Start by confirming that important pages are accessible, indexable and discoverable. After that, review canonical URLs, internal linking, sitemaps, mobile usability, HTTPS and performance. The highest priority is the issue that creates the greatest real obstacle to your important pages. |
Conclusion
A well-maintained technical foundation makes it easier for search engines to discover your content and for visitors to use your website. You do not need to master every advanced SEO concept before getting started.
Begin with Google Search Console, verify your sitemap, inspect robots.txt, check indexing controls and review the canonical URLs of your most important pages. Then move on to internal links, mobile usability, performance, structured data and regular monitoring.
For BlogEarns, technical SEO should be part of a broader organic traffic strategy. Combine this checklist with useful supporting content, relevant internal links and regular updates to existing articles. Your goal is not simply to make a website technically perfect. It is to make your best content easy to discover, understand and use.
Recommended next step: Start with the BlogEarns SEO Site Analysis guide, then use Google Search Console to identify the first three technical issues affecting your most important pages.